colincaprani.com

Structural Engineering, Bridge Research, Programming, and more…

Entries Comments


Combining cross-references in MS Word

3 September, 2018 (22:12) | General | 1 comment

I use MS Word for a lot of my writings (though I’ve come to dislike it intensely for more mathematical work). Cross-referencing Figures and Tables is a great time-saver, no matter how short you think the document will be, and how confident you are there will not be additional figures plopped into the middle! Rarely have I regretted the microseconds it takes to click Insert > Citation, and then Insert > Cross Reference.

But, this has bugged me for years:

Figure 8, Figure 9, and Figure 10 show that…

It should clearly be:

Figures 8, 9, and 10 show that…

(Note the vitally-important Oxford Comma!) Or better yet:

Figures 8-10 show that…

But how can this be done in MS Word? At last I found the answer. Enjoy: http://wordfaqs.ssbarnhill.com/CombineXrefs.htm

Journal Article Submission Figures Workflow

1 June, 2018 (23:07) | Research | 1 comment

After the blood, sweat, and tears is finished, and the article summarizing your wonderful research is ready to be submitted, well then there’s the submission process itself. Submitting articles to journals varies in difficulty with some allowing just a PDF of everything at once, and others requiring each table and figure to be uploaded as a separate file with sequential names. Frequently, images are best kept in a vector format for high-quality reproduction, and so this limits possible formats for uploading. And the final hurdle is that often the images are pasted (in context) into a MS Word document and so must be extracted for uploading to the submission engine.

So, starting from having an MS Word (docx) document with embedded vector format figures, here is a useful workflow to quicken things.

Extract Images

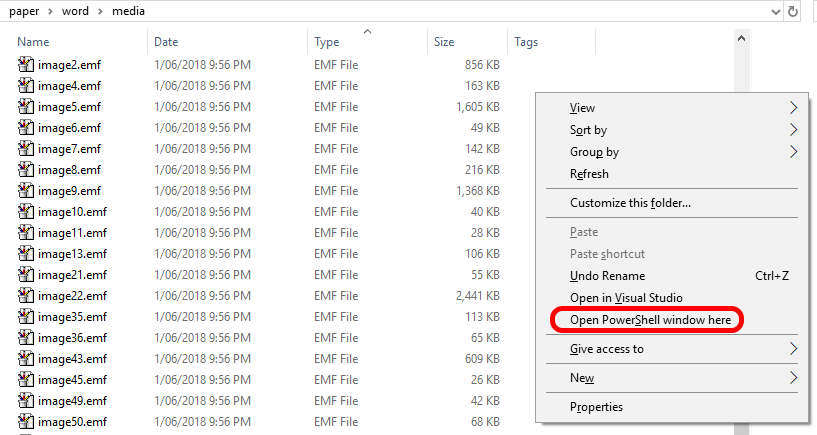
First copy the *.docx manuscript file for safety. Using F2 (or right-click and Rename) change the extension to *.zip. You’ll get a warning, but proceed. Docx files are really just zip files. Extract this zip file to a folder (say) /paper/. Traverse to ../paper/word/media/ and you can see all the images in the document. Some of these may be equations and so on, but the original format of the figures when pasted should distinguish these (e.g. *.emf for pasted images versus *.wmf for MS Word-generated images). Sorting by file type you should have something like this:

Convert Images

Batch converting the images is obviously preferable than opening each in a PDF converter. The bees knees when it comes to image conversion is ImageMagick: it’s freeware and very powerful, but has a command line interface which might put some people off, but don’t let it! So assuming you have now installed this…

Still in the ../paper/word/media/ folder, holding down shift, right click on some white space and select Open PowerShell window here
Enter the command:

1
mogrify --% -format pdf *.emf

which converts all the *.emf files to *.pdf files keeping the same filenames. the --%  is so that Powershell does not try to parse the following text, but passes it directly to the previous command, mogrify. Now you will have image2.pdf, image4.pdf and so on.

Sequential Numbering

Finally, these PDF files now correspond (presumably) to Figure 1, Figure 2, and so on in the document. The next step is to rename image2.pdf, image4.pdf and so on to Figure 1.pdf, Figure 2.pdf, and so on. To do this, select all the PDFs and right click on the first one in the sequence and select Rename. Type “Figure” and press enter. Windows Explorer automatically recognizes that there will be multiple files with the same name and so labels them Figure (1).pdf, and so on. note that the ” (X)” is added to each filename (including leading space), where X is the index of the file.

With this, you should now have the PDFs named correctly, and read for copying back to the main folder and batch uploading. You can delete the ../paper/ folder now (original extracted from zip file).

With some further fancy PowerShell commands, the parentheses can be extracted from the filenames if necessary.

Integrating LaTeXdiff with TeXStudio

31 August, 2017 (13:27) | Programming | 2 comments

Recently I’ve started using LaTeX for my more mathematical writing. Although I’ve been using MS Word + MathType for 15+ years, the frustration of bad typesetting, and the difficulty in changing formatting globally got too much for me. 

I’m using TeXStudio with MiKTeX in a Windows 10 environment (one step at a time…I’ll get to Linux eventually!).

As a postgraduate student supervisor, I make changes to text quite a bit, and MS Word’s Track Changes is very good for highlighting these changes. A tool to accomplish this in LaTeX is LaTeXdiff. Now, of course, since the LaTeX world is free, things aren’t quite as slick and user-friendly for installing as paying $100s for M$ products. So, to get LaTeXdiff up and running, took a little bit of effort, so here’s how I did it.

There are two main parts:

  1. Getting LaTeXdiff installed and working on your machine
  2. Getting a macro to automate things in TeXStudio

Good references for achieving various parts of this are:

However, not one of these worked for me in totality, and parts of the above were unnecessary, hence this post.

Installing LaTeXdiff

Very straightforward:

  1. Install the LaTeXdiff package through the MiKTeX Package Manager
  2. Install Strawberry Perl

You can verify this works by launching the “Perl (command line)” app (or just the usual cmd tool) from the Windows start menu. cd to your current directory with old.tex and new.tex versions of your file. Then execute

1
latexdiff old.tex new.tex > diff.tex

where diff.tex is the file to be written with changes marked in it. Then build the diff.tex to PDF and view something like this:

Integrating with TeXStudio

This was a bit trickier to accomplish, and took some experimentation. In TeXStudio, go to the menu Macros > Edit Macros... and add a new macro, calling it whatever you want (e.g. LaTeXdiff). Set, the macro as a Script style, and paste in the following script, which is also available to copy from PasteBin. Most of the script is for the user dialogs. At the end, it prepares a command line string, which TeXStudio executes in the shell. The stdout is then captured in readAllStandardOutputStr() and written to the diff file in the local directory. The diff file is then compiled and the PDF displayed in TeXStudio viewer.

1
2
3
4
5
6
7
8
9
10
11
12
13
14
15
16
17
18
19
20
21
22
23
24
25
26
27
28
29
30
31
32
33
34
35
36
37
38
39
40
41
42
43
44
45
46
47
48
%SCRIPT
 
var cf = app.getCurrentFileName();
 
var ld = new String(cf);
ld=ld.substring(0,ld.lastIndexOf("/"));
 
information("Select original file");
fileChooser.setDir(ld);
fileChooser.setFilter("TeX files (*.tex)");
fileChooser.exec();
var fold=new String();
fold=fileChooser.fileName();
fold=fold.substring(fold.lastIndexOf("/")+1);
 
information("Select revised file");
fileChooser.setDir(ld);
fileChooser.setFilter("TeX files (*.tex)");
fileChooser.exec();
var fnew=new String();
fnew=fileChooser.fileName();
fnew=fnew.substring(fnew.lastIndexOf("/")+1);
 
information("Select changes tracking file");
fileChooser.setDir(ld);
fileChooser.setFilter("TeX files (*.tex)");
fileChooser.exec(fout);
var fout=new String();
fout=fileChooser.fileName();
fout=fout.substring(fout.lastIndexOf("/")+1);
 
ldfout = ld+"\\"+fout;
 
var cmdstr = new String();
cmdstr = "latexdiff-so "+fold+" "+fnew+" > /dev/null";
var proc = system("cmd /C "+cmdstr,ld);
proc.waitForFinished();
writeFile(ldfout, proc.readAllStandardOutputStr());
app.load(ldfout); // load diff file
buildManager.runCommand("txs:///quick", ldfout);
 
delete(cmdstr);
delete(dialog);
delete(fold);
delete(fnew);
delete(fout);
delete(ld);
delete(ldfout);

IStructE: Australia meets Ireland

14 February, 2017 (23:19) | Engineering | No comments

Prof. Brian Uy, University of Sydney, will give a lecture to the Insitution of Structural Engineers, Republic of Ireland Regional Group on recent advances in steel composite structures in Australasia. Prof. Uy has extensive experience in conducting the research and developing the latest codes of practice for composite structures in Australasia.  He is the Chairman of the Standards Australia Committee BD32 on Composite Structures and a member of BD90 on Bridge Structures which have recently completed new standards on Steel and Composite Structures for buildings and bridges respectively.

Prof Uy has been the Chairman of the Australia Regional Group of the Institution of Structural Engineers (IStructE) since 2012 and the Australian Group of the International Association of Bridge and Structural Engineering (IABSE) since 2015.

The lecture will take place as follows:

  • 21 February 2017
  • Room F14 Newstead Building, UCD, Belfield
  • Admission is FREE and all are welcome.

Back up at last!

25 April, 2015 (05:52) | General | No comments

So this website disappeared for a while, as you may have noticed. In July 2013 I moved to Australia, to the Department of Civil Engineering at Monash University in Melbourne – see me here. It’s been a very busy time since then, and the website got lost in the mix. I’m really pleased to have sorted it out now, and look forward to posting regular updates on all things engineering, bridges, and teaching, as in the past.

I also moved host to allow for unlimited bandwidth, and so this means I can continue to share my lecture notes. In the past I had to stop this because of massive download traffic!

Here’s a pic of the West Gate Bridge – probably the most famous bridge around Melbourne. In a way, this is why I’m here!

West Gate Bridge enjoying a typical Melbourne sunset

« Older entries